


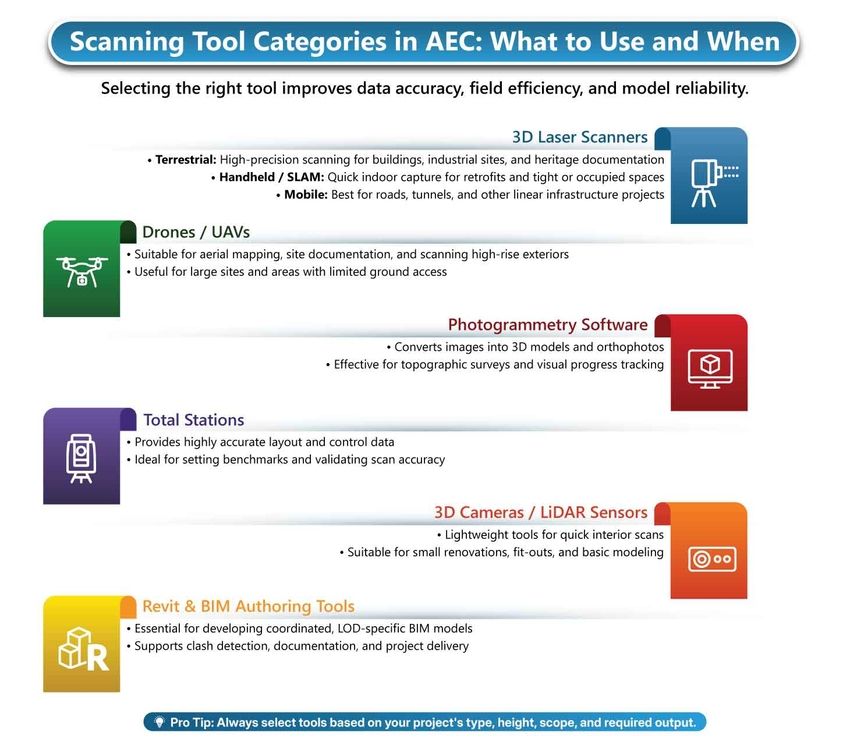
Why Choosing the Right Scan Tech Matters?
Selecting the right scanning or BIM tool is critical, not optional. For architects and surveyors, the wrong choice can derail even the best-designed projects.
Choosing a tool that doesn’t align with your project’s requirements can lead to:
- Incomplete or inaccurate data capture
- Costly rework and modeling delays
- Misaligned drawings and coordination issues
- Safety concerns in hard-to-access areas
Whether you're documenting a low-rise renovation or scanning a multi-story commercial build, one-size-fits-all doesn't work. The tool you use must be based on your project’s type, height, and scope to ensure reliable outcomes and smooth integration with BIM workflows.
This blog offers a practical, scenario-driven checklist to help you make the right choice, saving you time in the field, minimizing data gaps, and ensuring your models are as accurate as your design intent.
Understanding Your Project Parameters
Before selecting any scan tech or BIM tool, it’s essential to evaluate the core parameters of your project. Architectural Scan to BIM Services often run into issues not because tools lack capabilities, but because they’re misaligned with the project’s specific needs.
Let’s break it down:
Project Type
The nature of the project dictates your starting point. Start by defining the context of the project.
- New Construction: Prioritize tools that offer high accuracy and layout control. Total stations, drones, and terrestrial laser scanners are common.
- Renovation / Retrofit: Tools must navigate existing conditions with minimal disruption. Use SLAM-based scanners, handheld LiDAR, or 3D cameras for tight spaces.
- Restoration / Heritage Projects: Precision and surface detail matter. Choose high-resolution terrestrial laser scanners.
- Commercial / Residential / Industrial / Infrastructure: Each type comes with unique accessibility, safety, and accuracy challenges. Your tool must adapt accordingly.
- Interior vs. Exterior: Tools must be chosen based on GPS access, lighting conditions, and space constraints.
Project Height
Project height affects how you access vertical elements:
- Low-rise (1–3 floors): Handheld or stationary terrestrial scanners often suffice.
- Mid-rise (4–12 floors): Combine ground-based scanners with drones for external coverage.
- High-rise (13+ floors): Use long-range terrestrial scanners or UAVs with LiDAR for elevation and façade mapping.
- Vertical reach: Choose tools that safely access upper levels, without scaffolding or manual inspection.
Project Scope
Clarify what needs to be captured and modeled. Scope impacts tool resolution, field time, and post-processing effort.
- Full Building Documentation
- MEP Coordination & Routing
- Structural Analysis & Load Path Validation
- As-Built Modeling Services for Renovation/Permitting
- Clash Detection & Coordination Workflows
- Quantity Takeoff for Estimation & Procurement
- Façade and Roof Geometry Capture
- Interior Layout for Tenant Improvements
- Construction Progress Tracking
- Scan to BIM for Revit Model Creation
- LOD (Level of Development) Requirements:
- LOD 200–300 → Conceptual + schematic (basic laser or SLAM scanners)
- LOD 350–400 → Detailed coordination + fabrication (terrestrial scanners with high accuracy)
- LOD 500 → As-built conditions for FM integration (dense point clouds with verified geometry)
- COBie or Asset Data Integration for FM
By matching your scope and target LOD with the right capture method, you ensure precision, avoid rework, and deliver exactly what downstream teams need, no more or less.

Key Factors to Consider Before Choosing Scan Technology
Even the most advanced tool can underperform if it’s misaligned with the project environment or delivery goals. Before making a selection, architects and surveyors should assess the following technical and practical considerations:
Data Accuracy Requirements
- What level of detail and tolerance is needed?
- High-precision work, such as structural retrofits, façade studies, etc., may require terrestrial LiDAR.
- Conceptual or early-stage planning may allow for lower-accuracy tools like photogrammetry.
Budget Constraints
- Balance tool capabilities with project ROI.
- Avoid overinvesting in high-end tech for basic scopes.
Team Expertise & Training
- Does your team have experience with the selected tool?
- Consider ease of use, onboarding time, and post-processing skill requirements.
Site Conditions
- Accessibility: Are there tight interiors, rooftops, or active construction zones?
- Lighting and weather: Affects outdoor photogrammetry or drone flights.
Project Scope & LOD Expectations
- Match tool output with required LOD, like LOD 200 for feasibility, LOD 400 for fabrication.
- Include downstream uses such as clash detection, COBie asset tagging, or facility management handoff.
Software Integration
- Ensure compatibility with Revit, AutoCAD, Navisworks, or other BIM platforms.
- Smooth data transfer reduces rework and modeling errors.
Choosing a tool without these considerations increases the risk of incomplete data, modeling delays, and costly change orders.
5 Common Mistakes to Avoid When Choosing Scan Technologies & BIM Tools
Even experienced professionals can select the wrong Scan to BIM tool when project pressures are high and timelines are tight. For architects and surveyors, these missteps can lead to inaccurate models, inflated costs, and lost productivity.
Here are five frequent mistakes to avoid:
- Overinvesting in High-End Tools for Simple Scopes: Not every project needs millimeter-level accuracy. Using expensive terrestrial LiDAR for basic interior layouts leads to unnecessary costs and complex workflows.
- Ignoring Scope Creep and Tool Limitations: Projects evolve; therefore, a tool that suits early-stage capture may not scale for detailed modeling. Always evaluate whether your tool can adapt as the scope expands.
- Underestimating Post-Processing Effort: Capturing data is just the beginning. High-resolution scans require powerful systems, experienced modelers, and time-intensive cleanup, often overlooked during planning.
- Neglecting Software Compatibility: If your scan output doesn't integrate well with Revit, AutoCAD, or Navisworks, it creates downstream issues like rework, delays, and data loss. Failing to Plan for Data Reuse: Scan data often serves future renovation, FM, or lifecycle modeling. Skipping proper documentation or LOD standards limits future usability and ROI.
Avoiding these pitfalls ensures your Scan to BIM process is lean, future-ready, and aligned with project goals.
Conclusion: Make Every Project Count with the Right Scanning & BIM Tool
Choosing the right Scan to BIM tool is more than a technical decision; it’s a critical factor that impacts project accuracy, safety, and efficiency. Whether you’re working on a complex high-rise renovation or a simple residential build, mismatched tools can lead to costly rework, inaccurate models, and frustrated teams.
This checklist is designed to help you plan smarter by aligning tool selection with project parameters such as type, height, scope, and data requirements. Avoid common pitfalls and streamline every stage, from capture to modeling to final delivery.
Before your next site visit or modeling task, don’t revisit this guide to ensure your tools are purpose-fit and future-ready.
Looking for a reliable partner to turn your point cloud into precise BIM models?
